Welcome to the third instalment in my DevOps for Databricks blog series. Here we will take the Python scripts from the last blog (here) and incorporate them into CI/CD (Continuous Integration/Continuous Deployment) pipelines. All examples are available in full in the GitHub repo here
We will use Azure as our Cloud Provider of choice, and Azure DevOps as our DevOps platform of choice. As we are using the Databricks Rest API and Python, everything demonstrated can be transferred to other platforms. The DevOps pipelines are written in YAML, which is the language of choice for Azure DevOps pipelines, as it is for various other DevOps, including GitHub Actions and CircleCI.
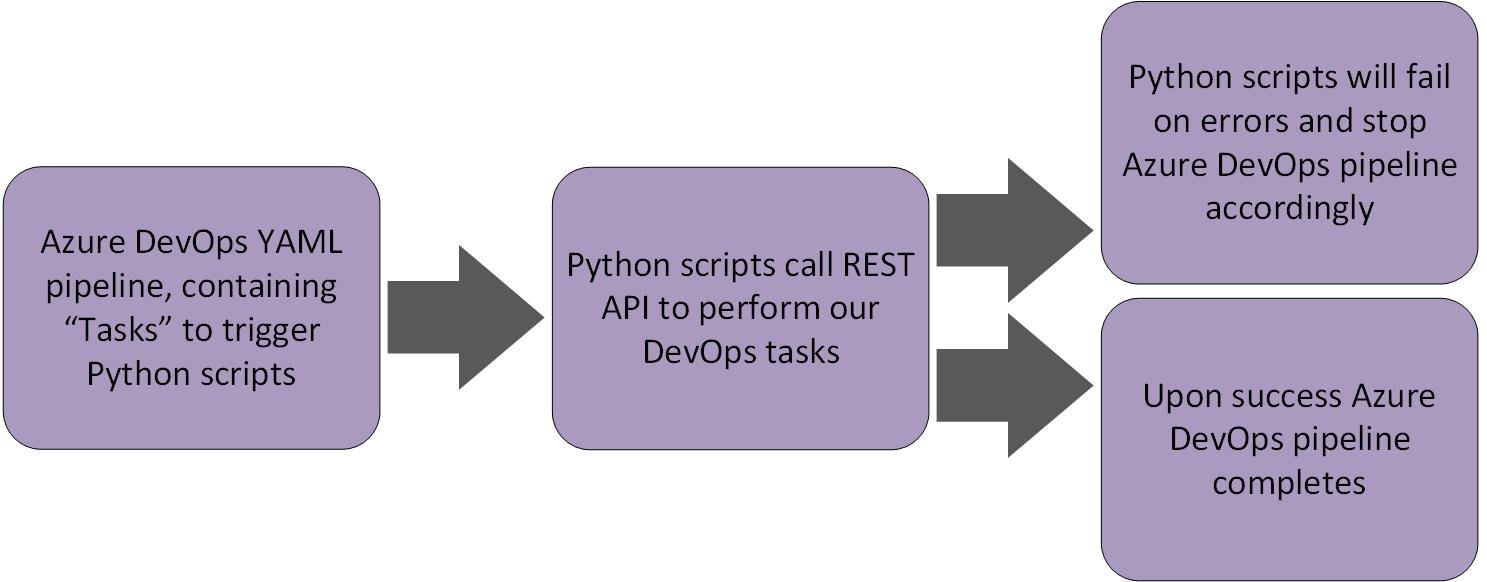
So, our DevOps flow is as follows:

Getting Started
First thing we need is a YAML file, create this in your solution alongside you pipeline scripts, it is best practice to keep these in separate folders, as you will find in the GitHub repo mentioned above.
Now we have our YAML file there are a few core bit of YAML we need:
-
Specify Triggers: Which branches will trigger the pipeline
-
Specify DevOps Agent: This can be an “Out of the box” Microsoft Agent or one you create yourself (DevOps Agents are the compute that runs your pipelines)
-
A connection to your Azure Key Vault in which you store sensitive information, such as your Service Principal Secret
All are illustrated in the following YAML:
trigger:
  branches:
   include:
    - main
  paths:
    include:
    - notebooks/*

pool:
  vmImage: 'ubuntu-latest'

variables:
- group: devops-for-dbx-vg
DevOps Stages, Jobs and Tasks
It is important we take a moment to understand the different steps we use in an Azure DevOps pipeline:
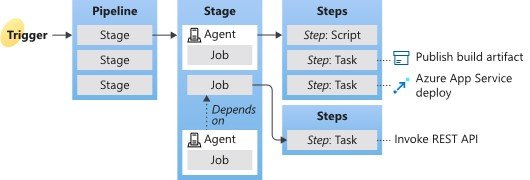
Stages
A Stages can be, for example Build and Release:
1. Build: Compile/check code, run tests
2. Release: Push everything into your environment
Jobs
Jobs run on one DevOps Agent, and can be used to group certain DevOps Steps/Tasks together
Steps
A Step can be a specific, granular “Script” or “Task”
The below diagram taken from Microsoft Documentation illustrates the relationships:

Authenticating
We need to authenticate with Databricks and store our Bearer and Management tokens as detailed in the previous blog (here). To do this, in the authentication Python script, we output the tokens from our dbrks_bearer_token and dbrks_management_token methods to Environment Variables:
DBRKS_BEARER_TOKEN = dbrks_bearer_token()
DBRKS_MANAGEMENT_TOKEN = dbrks_management_token()

os.environ['DBRKS_BEARER_TOKEN'] = DBRKS_BEARER_TOKEN
os.environ['DBRKS_MANAGEMENT_TOKEN'] = DBRKS_MANAGEMENT_TOKEN

print("DBRKS_BEARER_TOKEN",os.environ['DBRKS_BEARER_TOKEN'])
print("DBRKS_MANAGEMENT_TOKEN",os.environ['DBRKS_MANAGEMENT_TOKEN'])
print("##vso[task.setvariable variable=DBRKS_BEARER_TOKEN;isOutput=true;]".format(b=DBRKS_BEARER_TOKEN))
print("##vso[task.setvariable variable=DBRKS_MANAGEMENT_TOKEN;isOutput=true;]".format(b=DBRKS_MANAGEMENT_TOKEN))
An Environment Variable is a variable stored outside of the Python script; in our instance it will be stored on the DevOps Agent running the DevOps Pipelines. Consequently, it is accessible to other scripts/programs running on the DevOps Agent. We will not cover DevOps Agents in this blog specifically, the simplest description is that they are the compute that runs your pipeline, normally a VM (Virtual Machine) or Docker Container
The below YAML is creating an Azure DevOps Job that executes our authentication script:
- job: set_up_databricks_auth
	      steps:
	        - task: PythonScript@0
	          displayName: "Get SVC Auth Tokens"
	          name: "auth_tokens"
	          inputs:
	            scriptSource: 'filePath'
	            scriptPath: pipelineScripts/authenticate.py
	          env:
	            SVCApplicationID: '$(SVCApplicationID)'
	            SVCSecretKey: '$(SVCSecretKey)'
	            SVCDirectoryID: '$(SVCDirectoryID)'
Note the “env:” element, this is injecting Environment Variables from the secrets obtained from our Key Vault. These variables are then used in our authentication script (see GitHub repo here)
Create and Manage a Cluster
Now we have the foundation YAML things are getting easier, we know what we want to do, and have already create similar tasks. To create & manage the Cluster we simply need to create tasks, like in the authenticate Job already illustrated above.
The below YAML runs our script to create a cluster:
- job: create_cluster
      dependsOn:
        - set_up_databricks_auth
      variables:
        DBRKS_MANAGEMENT_TOKEN: $[dependencies.set_up_databricks_auth.outputs['auth_tokens.DBRKS_MANAGEMENT_TOKEN']]
        DBRKS_BEARER_TOKEN: $[dependencies.set_up_databricks_auth.outputs['auth_tokens.DBRKS_BEARER_TOKEN']]

      steps:
        - task: PythonScript@0
          displayName: "create cluster"
          name: "create_cluster"
          inputs:
            scriptSource: 'filePath'
            scriptPath: pipelineScripts/create_cluster.py
          env:
            DBRKS_BEARER_TOKEN: $(DBRKS_BEARER_TOKEN)
            DBRKS_MANAGEMENT_TOKEN: $(DBRKS_MANAGEMENT_TOKEN)
            DBRKS_SUBSCRIPTION_ID: '$(SubscriptionID)'
            DBRKS_INSTANCE: '$(DBXInstance)'
            DBRKS_RESOURCE_GROUP: '$(ResourceGroup)'
            DBRKS_WORKSPACE_NAME: '$(WorkspaceName)'
            DefaultWorkingDirectory: $(System.DefaultWorkingDirectory)
Note the “dependsOn” element, which makes sure the previous job has completed before this one is ran. If we did not do this, we would not have our authentication tokens: We parse our tokens to the script using the “variables” element
As part of our script triggered above, we monitor the cluster to make sure it is created successfully, as detailed in the previous blog here. If the cluster creation fails an error is thrown which in turn stops the DevOps pipeline
Add Notebooks
Ok, so things are getting even easier, we’ve added authentication then created a cluster using our YAML and Python Script, and yes, you’ve guessed it, to run the script to add Notebooks it is the exact same process, YAML Job(s) and Task(s). Below illustrates the YAML needed to achieve this:
- job: upload_notebooks
      dependsOn:
        - set_up_databricks_auth
      variables:
        DBRKS_MANAGEMENT_TOKEN: $[dependencies.set_up_databricks_auth.outputs['auth_tokens.DBRKS_MANAGEMENT_TOKEN']]
        DBRKS_BEARER_TOKEN: $[dependencies.set_up_databricks_auth.outputs['auth_tokens.DBRKS_BEARER_TOKEN']]

      steps:
        - task: PythonScript@0
          displayName: "upload notebooks to DBX"
          inputs:
            scriptSource: 'filePath'
            scriptPath: pipelineScripts/upload_notebooks_to_dbx.py
          env:
            DBRKS_BEARER_TOKEN: $(DBRKS_BEARER_TOKEN)
            DBRKS_MANAGEMENT_TOKEN: $(DBRKS_MANAGEMENT_TOKEN)
            DBRKS_SUBSCRIPTION_ID: '$(SubscriptionID)'
            DBRKS_INSTANCE: '$(DBXInstance)'
            DBRKS_RESOURCE_GROUP: '$(ResourceGroup)'
            DBRKS_WORKSPACE_NAME: '$(WorkspaceName)'
            DefaultWorkingDirectory: $(System.DefaultWorkingDirectory)
Summary
So we’ve looked at the basics on setting up an Azure DevOps pipeline to run our Python scripts. Hopefully you can see how easy this is to glue together once you have the basic YAML set up.
In the GitHub repo here you will find examples of working with Azure DevOps Stages and Artifacts, for this blog we kept it simple
Topics Covered :
Author
Anna Wykes


